When renovating your bathroom or replacing an old bath panel, it’s essential to get the installation right. Fitting a bath panel may seem like a simple task, but it can sometimes prove tricky, especially if you’re aiming for a clean and professional finish. Whether you’re looking to improve the look of your bathroom or conceal unsightly plumbing, learning how to fit a bath panel correctly can save you time and money. This guide will take you through everything you need to know about how to fit a bath panel, ensuring a smooth and efficient installation process.
Introduction to Bath Panels
A bath panel is a covering designed to conceal the unsightly plumbing under your bathtub while also enhancing the overall aesthetic of your bathroom. It provides a finished, polished look to your bath area, ensuring that your bathroom appears organized and clean. Available in a variety of materials such as acrylic, MDF, and wood, bath panels are available in both fixed and adjustable styles, which makes them suitable for any bathtub.
The installation of a bath panel can be a great DIY project, but it does require some careful planning. Whether you have a straight, corner, or freestanding bath, the process of fitting the bath panel remains largely the same, with slight modifications based on the type of panel you choose.
Why You Should Install a Bath Panel
Installing a bath panel has several benefits. Apart from its primary purpose of concealing plumbing, it also adds to the aesthetics of your bathroom. An attractive bath panel can change the entire look of the bathroom, making it more modern or stylish. Bath panels can also be used for additional purposes such as creating hidden storage or space for essential accessories.
Furthermore, a properly installed bath panel helps to protect the bath from water damage, reduces the risk of mold or mildew buildup under the bath, and helps ensure the longevity of your plumbing system.
Types of Bath Panels
Before you start fitting a bath panel, it’s essential to understand the different types available. There are various materials and installation options, each with its advantages and challenges.
1. Acrylic Bath Panels
Acrylic panels are one of the most common choices for bath panels due to their versatility, ease of maintenance, and durability. They are typically lightweight, easy to cut to size, and come in various finishes, including gloss and matte. Acrylic panels are also resistant to mold and mildew, making them ideal for bathrooms with high moisture levels.
2. MDF Bath Panels
Medium-density fiberboard (MDF) is another popular material for bath panels. These panels are typically more affordable than acrylic options but require more care to prevent water damage. MDF panels can be painted to match your bathroom décor, offering flexibility in design. However, they need to be sealed properly to prevent moisture from causing damage over time.
3. Wooden Bath Panels
For those seeking a more natural or rustic aesthetic, wooden bath panels provide a timeless and classic look. They are perfect for traditional-style bathrooms but require more maintenance to prevent damage from water exposure. Wooden panels should be treated with special water-resistant finishes and may need periodic re-sealing to ensure they stay in good condition.
4. Custom-Fit Bath Panels
Custom-fit bath panels are a great option if you have an unusual bathtub size or if you prefer a more tailored look. These panels are often made to measure and can be crafted from a variety of materials. Although custom bath panels can be more expensive, they provide a seamless, perfect fit.
Tools and Materials You’ll Need
Before you begin fitting a bath panel, you need to gather the necessary tools and materials. Having everything ready will save you time and ensure the process runs smoothly.
Essential Tools:
-
Measuring tape
-
Saw (for cutting panels to size)
-
Drill with screwdriver bit
-
Screws or adhesive (depending on the installation method)
-
Spirit level (for accuracy)
-
Utility knife (for trimming)
-
Silicone sealant (for waterproofing edges)
Essential Materials:
-
Your chosen bath panel (acrylic, MDF, or wood)
-
Screws or adhesive (depending on the type of fitting)
-
Silicone sealant for waterproofing
-
Possibly, wood filler or paint if you’re working with wood
Step-by-Step Guide to Fitting a Bath Panel
Now that you’ve gathered your tools and materials, it’s time to install the bath panel. Follow these steps for a successful installation:
Step 1: Measure the Length and Height of the Bath
Before you buy your bath panel, it’s essential to measure your bathtub to ensure that you choose the right size panel. Measure the length of the side and front of the bath. Additionally, measure the height of the bath from the floor to the top edge where the panel will sit. Be sure to measure twice to avoid any mistakes when cutting your panel.
Step 2: Prepare the Bath Panel
Once you have the correct measurements, you can start preparing your bath panel. If the panel is too large for your bathtub, you will need to trim it to fit. Acrylic panels can be easily cut with a handsaw, while wooden panels may require a more precise approach, such as using a jigsaw or circular saw.
For MDF panels, you can use a regular saw, but make sure to seal the cut edges to prevent moisture damage. If your panel has decorative features, ensure that these are correctly positioned after cutting.
Step 3: Position the Bath Panel
Now that your panel is the correct size, position it along the side of your bathtub. Use a spirit level to check that the panel is aligned correctly and level with the bath’s edge. For front panels, ensure that they align with the front edge of the tub for a sleek, clean look.
Step 4: Attach the Panel
At this point, you need to secure the panel to the bath. Depending on the type of panel you have, you can either use screws, adhesive, or both. If your bath has pre-drilled holes, align the panel with the holes and attach it using screws. Make sure to tighten them gently to avoid cracking or damaging the panel.
For adhesive fittings, apply a generous amount of adhesive to the back of the panel and press it firmly into place against the bath. You may need to hold it in position for a few minutes to allow the adhesive to bond effectively.
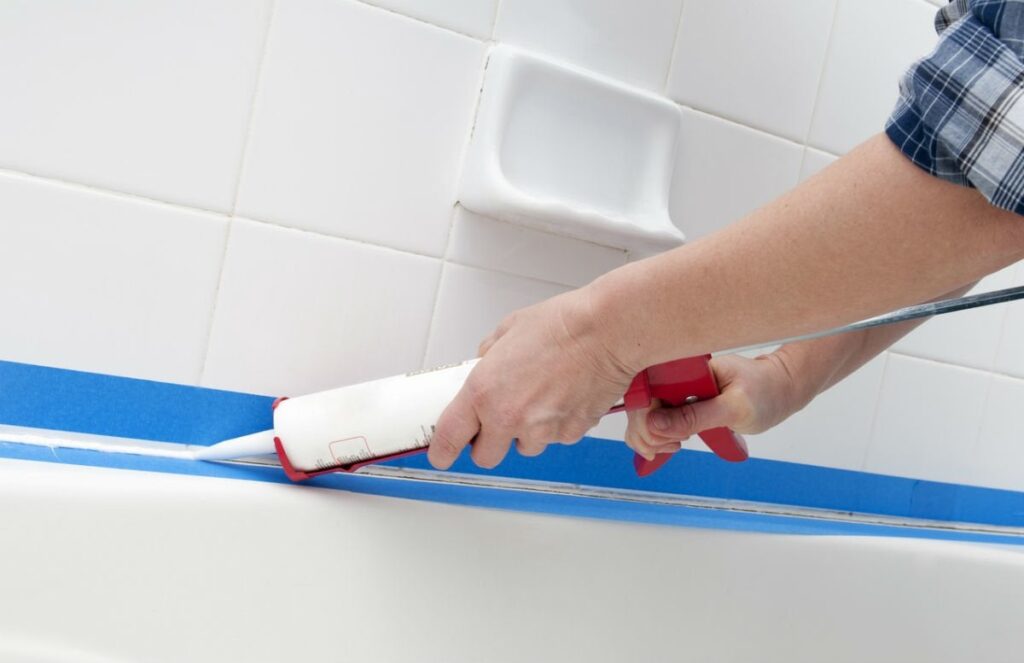
Step 5: Seal the Edges
To prevent water from seeping behind the panel, apply silicone sealant along the top edge where the panel meets the bath. Be sure to apply the sealant evenly and avoid leaving any gaps. This step ensures a watertight seal, preventing water damage and mold growth in the long term.
Step 6: Allow to Dry
After installation, give the adhesive or silicone sealant some time to set and dry. Follow the manufacturer’s instructions for the drying time. While waiting, avoid using the bath to ensure that the panel stays in place as it bonds.
Common Issues When Installing a Bath Panel
While the process of fitting a bath panel is relatively simple, there are a few common challenges that can arise. Here’s how to address them:
Uneven Walls
If your bathroom walls are uneven, fitting the bath panel can be tricky. You may need to trim the panel slightly to accommodate any discrepancies. Alternatively, you can use flexible adhesive to help the panel conform to the uneven surface.
Incorrect Measurements
One of the most common issues during bath panel installation is incorrect measurements. Ensure that you measure both the length and height of the bathtub correctly before buying your panel. If in doubt, consider buying an adjustable panel that can be customized to fit various bathtub sizes.
Moisture Damage
Improper sealing around the edges of the panel can lead to water damage over time. Be sure to apply silicone sealant generously around the panel to prevent moisture from getting underneath.
Final Thoughts on Bath Panel Installation
Fitting a bath panel is a simple but crucial part of your bathroom renovation or upgrade. By following the steps outlined in this guide, you can achieve a professional, neat, and secure installation that will enhance the look of your bathroom and ensure your bathtub remains protected.
Whether you’re installing an acrylic, MDF, or wooden panel, taking the time to measure correctly, use the right tools, and properly seal the panel will result in a long-lasting, beautiful finish. With proper maintenance, your bath panel can last for years and add a touch of elegance to your bathroom.
FAQS
1. What is the best material for a bath panel?
-
Acrylic panels are popular because they are durable, easy to clean, and water-resistant. They also come in a variety of finishes, such as gloss and matte, to suit different bathroom styles.
-
MDF is a cost-effective option but needs to be sealed properly to avoid moisture damage.
-
Wooden bath panels offer a classic, natural look, but require more maintenance to prevent water damage.
2. How do I measure for a bath panel?
-
Measure the length of the bathtub along the side that will be covered by the panel.
-
Measure the height from the floor to the top edge of the tub.
-
Always double-check your measurements to avoid cutting the panel incorrectly.
3. Can I fit a bath panel myself?
-
Yes, fitting a bath panel is a relatively simple DIY task if you have the right tools and materials. Most people can install a bath panel without professional help, as long as they follow the instructions carefully.
4. How do I attach a bath panel to my bathtub?
-
Depending on the type of panel, you can attach it using screws, adhesive, or clips. For an adhesive panel, apply a strong bonding adhesive to the back of the panel and press it firmly in place. For screw-fitted panels, drill the panel into place using pre-drilled holes.
5. Do I need to seal the edges of the bath panel?
-
Yes, it’s essential to seal the edges of the panel with silicone sealant to prevent water from seeping behind the panel, which could lead to mold and mildew buildup.
6. How long does it take to fit a bath panel?
-
The time it takes to fit a bath panel depends on the complexity of the installation, but generally, it should take about 1 to 2 hours for a straightforward installation.
7. What should I do if my bath panel doesn’t fit?
-
If your bath panel is too large, trim it to fit the dimensions of your bathtub. If it’s too small, you may need to purchase a new panel or opt for an adjustable one.
8. Can I cut a bath panel to size?
-
Yes, most bath panels, especially acrylic ones, can be easily cut to size with a saw. Be sure to use the proper tools and measure carefully before making any cuts.
9. Do bath panels come in adjustable sizes?
-
Many manufacturers offer adjustable bath panels that can be customized to fit different bathtub sizes. These are a great option if you’re dealing with an irregular bathtub or if you want more flexibility.
10. Is there a difference between front and side bath panels?
-
Yes, a front bath panel covers the front part of the bathtub, while a side panel covers one or both sides. The installation process is similar, but side panels may require more customization depending on the bathtub’s shape.
11. Can I use a bath panel for a freestanding bathtub?
-
Most bath panels are designed for built-in bathtubs. However, there are freestanding bath panels available that are specifically designed to fit around freestanding tubs.
12. Do I need any special tools to fit a bath panel?
-
Typically, you’ll need basic tools like a measuring tape, saw, drill, screws, adhesive, and a spirit level. More advanced tools may be required for trimming or custom fitting panels.
13. Are bath panels waterproof?
-
Most bath panels are water-resistant, but it’s crucial to seal the edges properly to prevent water from seeping behind the panel. If you choose wood, ensure it is treated to be water-resistant.
14. Can I install a bath panel on my own?
-
Yes, it is a simple DIY project. However, you will need to ensure that you have the right measurements, tools, and materials. If you’re unsure, it’s always best to consult with a professional.
15. Why do I need a bath panel?
-
A bath panel not only conceals the plumbing underneath your bathtub but also adds a finished, sleek appearance to your bath area. It’s also a practical feature, helping prevent debris and dust buildup underneath the tub.